Scheduling an Operation
Do the following steps:
1. Access the Device Operations panel.
2. Click on the New Schedule button.
3. Select the type of operation from the drop down list and click on the Next button.
The New Operations Scheduler displays new schedule parameters.
4. Specify the schedule parameters:
|
Parameter |
Description |
|---|---|
|
Name |
The name of the operation to be created |
|
Frequency |
The frequency at which the operation is to be executed. Other fields on the panel might change depending on the selected frequency. NOTE: If you select "One Time" as the operation frequency, the operation cannot be edited once it is saved. |
|
Schedule time zone |
The time zone that is used to execute the scheduled operation |
|
Execution starts at |
This field appears if Frequency is set toHourly, Daily, Weekly, or Monthly. The time that the scheduled operation is to begin. The operation begins at this time for all devices associated with the schedule operation, regardless of the local time of the devices. |
|
Execution must begin within |
The time period within which the operation must begin. When taken with the Schedule start time, this setting determines the latest time that the operation can begin. |
|
Execution must complete within |
The maximum time period that the operation can run for. When taken with the Schedule start time, this setting determines the latest time that the operation can finish. |
|
Schedule activation date |
The date that the scheduled operation begins. |
|
Execution retry attempts |
Select the number of retry attempts. The operation attempts at least once in the scheduled time period. However, in case of failure, Mitel Performance Analytics attempts the operation this number of additional times. |
|
Schedule expiry data |
The last date that the scheduled operation can occur. |
|
Alarm Severity on Failure |
Select the alarm severity to use if the device operation fails. The default severity is Major. |
The following is an example.
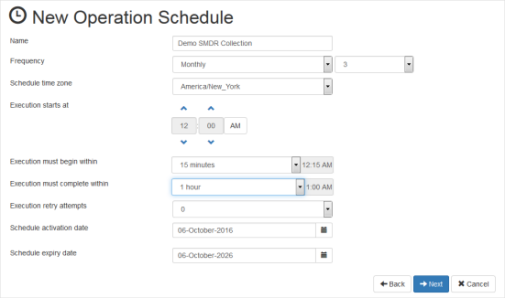
In the previous example, SMDR collection is schedule to occur on the third of each month, starting between 12:00 midnight and 12:15 am and lasting no later than 1:00 am. If SMDR collection fails, no retries are attempted. The SMDR collection starts October 6th, 2016 and runs until Octobrt 6th, 2026.
5. Specify the operation-specific parameters as required.
|
Setting |
Description |
|---|---|
| Backup Parameters | |
|
MiVoice Business |
Configure the following settings: Include Call History: Optionally include Call History in the backup. Include Voice Mail: Optionally include Voice Mail in the backup. |
|
MiVoice MX-ONE |
Perform System Configuration MirrorOptionally backup all nodes of the telephony system. A regular MX-ONE backup stores telephone user data only. A mirror backup also stores the configuration data of all the nodes. Notes: A mirror backup can consume significant MX-ONE resources. Perform a mirror backup only during off peak hours. By default, backup files are limited to 300 MB. If your backup files are larger than 300 MB, contact support for the procedure to change the default setting. |
|
MiVoice 5000 Backup Parameters |
Select the items to include in the backup: • Include PABX data • Include Directory Records • Include Announcements • Include IVR Messages • Include Code Backups |
|
Schedule outputs destination |
The default file storage location varies depending on the type of installation: For cloud-based installations, Mitel Performance Analytics stores the files to secure offsite storage (Amazon S3). For on-premise installations, Mitel Performance Analytics stores the files on its file system file store. To use an external server, select Use external FTP server: Select the protocol from the dropdown list. You can use the following protocols: SFTP (SSH File Transfer Protocol), FTP (File Transfer Protocol), or FTPS (Secure File Transfer Protocol). Both implicit and explicit FTPS are supported. Supply the URL to the server. Supply the credentials to access the server. Supply the port to use. |
| Backup (Cloud Storage) | |
|
MiVoice Business |
Refer to "Scheduling MSL Based Device Backups".
|
|
MiVoice Border Gateway |
|
|
MiCollab |
|
| Device Upgrade | |
|
Target Manifest Version |
Select the manifest version that you want to upgrade the devices to. |
|
Backup before upgrade |
Select this option if you want to back up the devices before the upgrade operation begins. Note: If the backup fails on a device, the upgrade operation is canceled for that device. |
|
Reboot before upgrade |
Select this option if you want to reboot the device before the upgrade process begins. |
|
Reboot after upgrade |
Select this option if you want to reboot the device once the upgrade is completed. |
|
Skip the upgrade checklist |
Select this option if you want the upgrade operation to skip the upgrade checklist that has been configured for the device. If the upgrade checklist is not skipped, you must manually check off all the pre-upgrade checklist items for the devices included in the upgrade schedule. |
|
Autocomplete the upgrade |
Select this option if you want to complete the device upgrade automatically, instead of manually completing the upgrade checklist once the upgrade process is finished. This option is only available if a post-upgrade checklist has not been configured for the device. |
|
Notes: The pre-upgrade checklist (unless skipped in the schedule settings) must be completed for each device included in the schedule prior to the upgrade. You can configure notification alarms to remind you prior to the upgrade. See "Configuring Device Upgrade Notification Alarms". Once the device upgrade operation is completed, you must then manually complete the post-upgrade checklist for each of the upgraded devices. If you schedule an upgrade to run on multiple devices, if the upgrade fails for one device, the upgrade operation is canceled for all of the devices in the schedule. In the case of a failed upgrade, in order to run the upgrade again, you must manually cancel the existing upgrade plan for each of the devices included in the schedule before a new upgrade plan can be scheduled. |
|
| MiVoice Business Internal Scheduler Activities
Refer to "About MiVoice Business Activities" for related details. |
|
|
Go to Night Service |
Service Option: Night 1 or Night 2 |
|
HotDesk Logout |
User Option: All, Internal, or External |
|
IDS Full Synch |
Configure the following settings: Use Global Catalog Domain Set: List of domains to scan when not using the global catalog Synchronization Type: Apply, Detain, or Compare Allow Delete Operation |
|
IDS Incremental Synch |
Configure the following settings: Use Global Catalog Domain Set: List of domains to scan when not using the global catalog Synchronization Type: Apply, Detain, or Compare Use Default Query String Query String: Query string to use when not using the default string |
| MSL Reboot | |
|
Force reboot |
Select this option to force the reboot to occur, even the device is currently busy with other operations. Once the reboot begins, a banner message is displayed on the device's dashboard indicating that the reboot is in process. The banner is updated when the reboot is successful, or if it failed, along with a reason for the failure. You can click the Dismiss button at anytime to close the banner message. |
| SMDR Collection
Refer to "SMDR Collection" for details. |
|
|
Schedule outputs destination |
Configure the following settings: Use External FTP Server: This is the recommended approach. Protocol: Select one of FTP, FTPS, or SFTP External Sever URL: Type the server URL and file path to use User Name: Type the user name to use with the external server Password: Type the associated password for the provided user name Port: Type the port to use |
Click Save when all the parameters have been specified.
6. Select the devices that the operation applies to:
Use click, shift-click, and ctrl-click to select the devices from the left list.
Click the Add button to move the devices to the right list. Or double-click on the selected devices.
Use the search fields at the top of the device lists to locate devices to move.
Click the Done button at the bottom of the panel when you are done selecting the devices that the operation applies to.
7. Click the Done button to save and exit.